Docassemble Legal Motion Tutorial
A simple example of a Docassemble interview that automates a Word document to create a motion to dismiss and introduces you to basic Docassemble concepts. You do not need to be a programmer or a lawyer to complete this tutorial.
Created by Quinten Steenhuis and Rina Padua at Greater Boston Legal Services.
This tutorial was created to make use of features in Docassemble Version 0.2.39 (released in March, 2018) and should work with any later version.
How to use this tutorial
You can use this demo repository to learn the basics of creating a guided interview in Docassemble with a best-practices workflow for an individual or a small team. There are many ways to use Docassemble. When you complete this tutorial you will understand how to:
- Use a Microsoft Word document as a template for your guided interview
- Understand the most common datatypes in Docassemble
- Use basic logic and conditional statements in a template and in the guided interview
- Use Google Drive sync integration to make editing templates a simple part of the interview workflow
- Use GitHub integration for version control in Docassemble
You can use Docassemble without setting up GitHub or Google Drive. Google Drive makes the process of editing Microsoft Word templates much easier and more natural. GitHub integration will help you better work in a team, recover from mistakes in your code, and offer a helpful backup of your work at different points in time.
Basic concepts of document assembly
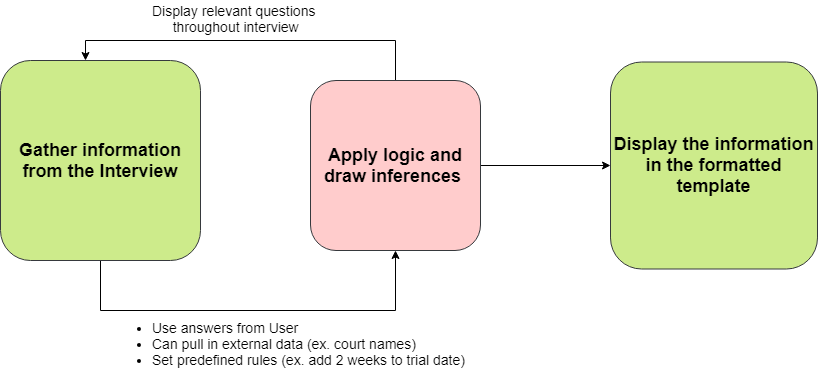
The document assembly process can be separated into 3 logical steps: gathering information from the user in an interview, applying logical reasoning to the information, and finally assembling the information into a formatted document. A common scenario is completing a letter or legal pleading, where one or more blanks (called variables or fields) will be completed using responses obtained in the interview process. It is a greatly advanced version of search and replace.
Docassemble adds some special features that make it especially compelling for use in document assembly.
- You can pull in information from other sources on the Internet, such as Google Maps, and apply logical reasoning to it.
- You have access to a full featured object oriented programming language, Python, and all the thousands of modules that have been built by others
- Advanced features like interviews over text messaging, electronic signatures, and even artificial intelligence in the form of machine learning are all built-in.
Docassemble has a learning curve, but as your confidence and skills grow, you won’t find yourself limited by the platform as it is as flexible as the Python programming language itself. Yet even non-programmers will find that they can get started with Docassemble pretty quickly.
A note about the technologies used in Docassemble
Docassemble makes use of many different component parts. Usually the Docassemble documentation contains everything you need to know about those components. Sometimes you run into a gap in the documentation and may decide to do your own research. Here are some of the technologies that we use in our demonstration:
- YAML for the interview file format.
- Python for logic in the interview and template.
- Mako for formatting questions in the interview file.
- Jinja2 for formatting answers in your template.
This tutorial includes everything you need to know about those technologies to complete the tutorial. However, it can helpful to know what terms to Google if you run into a stumbling block. The Docassemble Slack channel is also an excellent place to get troubleshooting assistance when a question is not answered in the documentation.
Getting started
Follow the comprehensive Docassemble documentation for these first few steps:
- Install Docassemble. If you just want to try out Docassemble, we recommend installing Docassemble on your laptop or workstation with Docker. You may need to enable virtualization extensions in your computer’s BIOS settings to run Docker.
- Create a new account on GitHub and Google if you don’t already have accounts on both platforms.
- Enable GitHub and Google Drive Sync integration.
- Create a folder in Google Drive called
docassemble-playground(or another name of your choice). - Add your GitHub and Google accounts from the Profile menu in Docassemble. Connect Google Drive to the folder you created above,
docassemble-playground. - Fork this repository on GitHub.
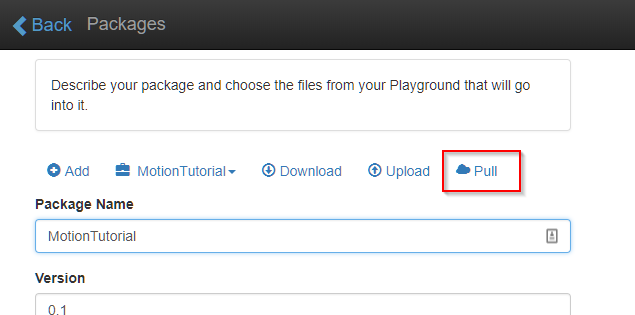
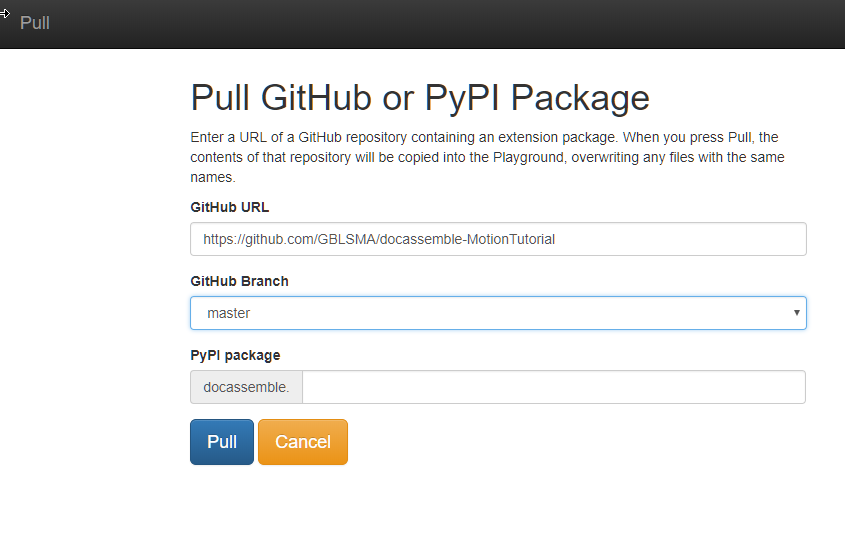
- Pull the forked repository into your playground from Folders
|Packages menu. Make sure you pull the repository that you created by forking this repository. Forking will make a copy of the repository that you can update and change as much as you like.
Configure Microsoft Word to work with Docassemble
To prevent problems, it’s recommended that you turn off automatic smart quotes while creating templates in Microsoft Word for Docassemble. Instructions vary. In recent versions of Word, you can turn off smart quotes by clicking File | Options | Proofing, selecting Autocorrect and uncheck the box “Smart quotes with straight quotes” under “Replace as you type” on both the Autoformat and Autoformat as you type tabs.
A tour of the Playground
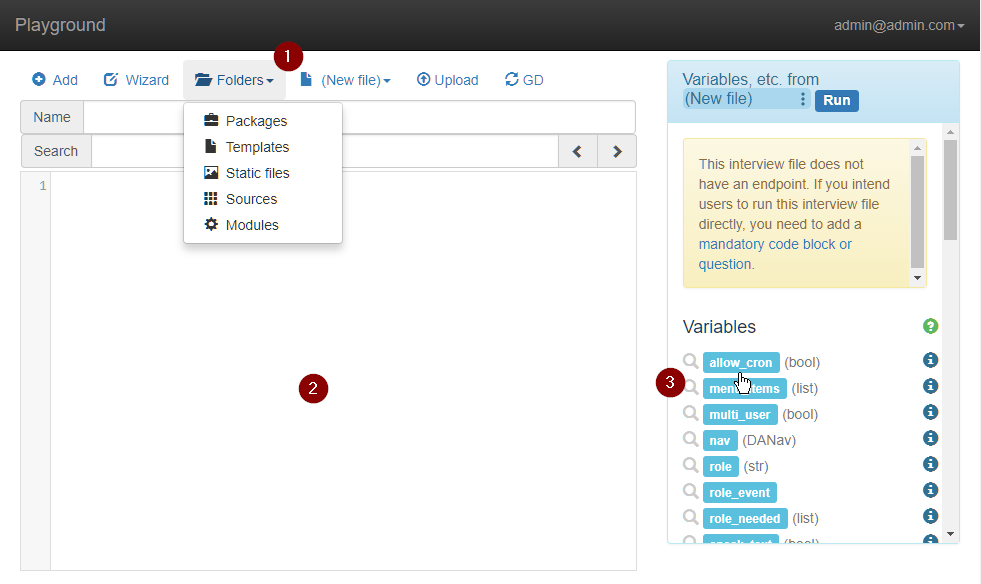
This is a view of the Docassemble playground. You start out in the interview editing mode.
- The Folders button lets you access different sections of the playground. You’ll use this menu to switch between saving your changes to GitHub, uploading new files, and editing templates.
- The main window that fills your screen is a text area where you can edit the interview script.
- The list of variables can be used as a reference while you’re working on the interview.
How the Playground, Github, Google Drive, and the Interview and Template all connect

The diagram above shows how Google Drive, Github, the interview, and the template are all connected.
- The template is the final document you want to print or file in court. Edit the templates in Microsoft Word. Formatting goes here.
- Save your templates on Google Drive, and sync them to the Playground.
- Your interview is used to “fill in the blanks” in the template. Edit interviews in the Playground.
- As you complete each task to develop your interview,
commityour work in progress to Github. You can also sync to Google Drive to make a local copy of your interview and template files. - Variables are placeholders that can be filled-in with questions during the interview and then referenced in the document template.
Files included in the demo project
This sample project includes several files to get you started:
Interview Files
- interview-skeleton.yml (A basic outline of an interview that assembles a Word Document. Start with this)
- interview-basic.yml (A completed version of the basic interview. Use for reference only)
- interview-withlogic.yml.yml (A completed version of the interview that uses logic. Use for reference only)
Template Files
- Motion to Dismiss-Original.docx (The original file that we will edit to automate it)
- Motion to Dismiss-Final.docx (A completed version of the template. Use for reference only)
Testing the demo interview
In the Playground, select the interview-skeleton.yml file.
Click the “Save and Run” button to see how the interview works.
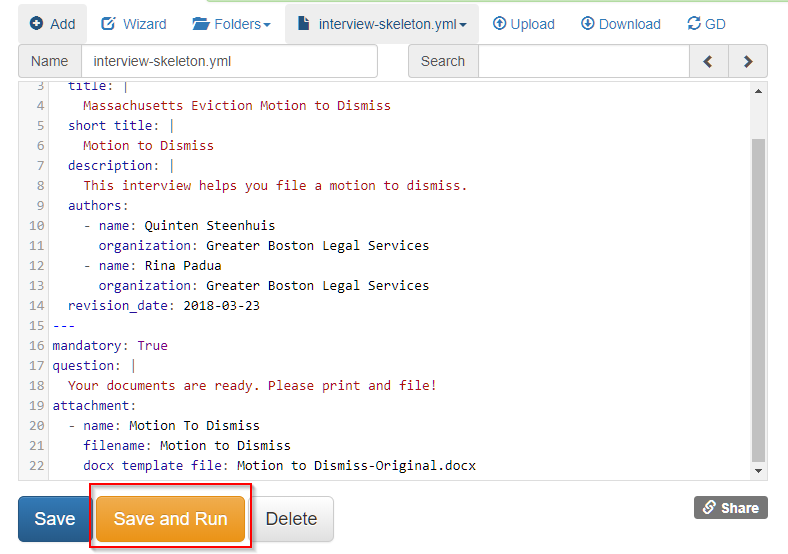
You’ll see a screen that lets you download the Word document. Notice how no questions are asked yet. That’s because we haven’t added any and there are no variables in the template yet that need to be defined. This interview simply outputs a Word document with no customizations.
Once we add variables to the template, Docassemble will work backwards to try to ask whatever questions are needed to define those variables.
Making your first change to a template
Let’s start by opening our Word document, Motion to Dismiss-Original.docx in the docassemble-playground folder in your Google Drive account. You should sync this folder to your local computer for the simplest workflow.
Try making a change anywhere in the document. A classic first programming exercise is to output the text “Hello, World.” Try adding the text “Hello, World” somewhere in the document and save the file.
Wait 10-20 seconds, and click the Sync button in the playground again. Try running the interview one more time and verify that the text “Hello, World” is now in your template file.
Making your first edit to an interview
Interviews use YAML syntax. If you run into a problem with your interview file, it may help to know that you can Google YAML concepts.
In the Playground, select the interview-skeleton.yml file. You should notice that the interview file contains two different sections: a “metadata” section, and an attachment block that begins with the line “Mandatory” that includes the filename Motion to Dismiss-Original.docx. It may be useful to know that each section, separated by three dashes ---, is called a document in the YAML file format of a docassemble interview. Each interview page will have its section in the interview file. Indentation is important in the interview file. It tells Docassemble how to interpret the information in the interview file. Docassemble makes it easy to set the right indentation by using the [TAB] key.
We’ll start by customizing the page where we can download our document. Let’s try adding a subquestion instruction to our download screen. Review the documentation for a subquestion instruction.
Let’s change our download page to include the text “Hello, Download.”. Try it on your own first, then read ahead.
To do this, your interview file should now have a line directly underneath the line that begins with Your documents are ready. that looks like this:
subquestion: |
  Hello, Download.
Notice the vertical pipe |. It’s a best practice to include this when you type in text to avoid glitches with Docassemble. Whenever you use it, make sure to include a space after the : and indent the following line. Two spaces is the traditional indent in Docassemble, and hitting the [TAB] key is a quick way to enter those two spaces.
Run the interview again and confirm that the download screen now includes the text Hello, Download.
Next try updating the metadata section so that you are the author of the interview. Try updating the title and short title to see how they change the interview when viewed with different browser window sizes.
Understanding code blocks
Code blocks allow us to add logic to an interview. You don’t need to be a programmer to use Code blocks. Code blocks use Python syntax. If you get stuck or run into an error, Googling Python concepts will help you solve your problem.
Let’s create a very basic code block using the example from the Docassemble documentation. This will also be our first introduction to variables. Variable will be used as a synonym for field in this tutorial.
Add a new section into your interview-skeleton.yml file. Don’t forget to begin it with --- on its own line. Let’s assign the value 2 + 2 to a new variable named answer. Your completed code block should look like this:
---
code: |
  answer = 2 + 2
Now lets edit our attachment block subquestion to state “The answer is (the value of the answer variable)”. Refer back to the example to understand how to display a variable in a question. This is our first introduction to displaying a variable in an interview. The main thing to know is that variables can be used in a question by surrounding them by ${variable_name}. Try it on your own first. When you are finished, your attachment block should look like this:
question: |
  Your documents are ready. Please print and file!
subquestion: |
  Hello, Download. The answer is ${answer}.
Finally, lets edit our locally saved template Motion to Dismiss-Original.docx to include the answer variable as well. Try it on your own first by referring to the Filling DOCX Templates documentation. When you are finished, your template should include text that looks like this:
Hello, World. The Answer is {{ answer }}
Notice that while in an interview question, we display a variable like this: ${variable_name} but in our template, we include a variable by surrounding it with double brackets like this: {{variable_name}}.
Click the GD button to sync the playground with Google Drive and update the copy of the Word file in our Docassemble playground.
Run the interview one more time to verify your changes were made.
Committing your first changes to Github
Let’s save our work so far. It’s a good practice to commit to Github whenever you make a working change to your interview or template.
Use the Folders menu to navigate to the Packages page. Look over the fields on this page. Notice that if you have multiple packages that you are working on, the package name will be a dropdown menu that you can use to select the package that you wish to update.
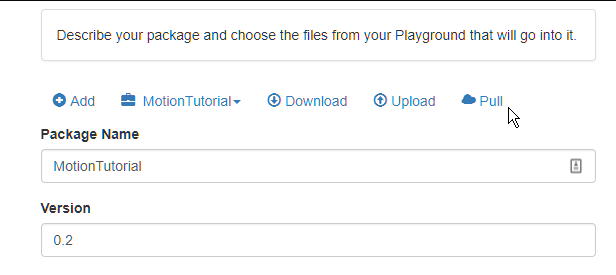
Try updating the Author and Author Email to your own name. Notice that you can select files from the Playground to include the package. If you want to add additional files to the package later, here is where you will do it. Only files that you select on this screen will be committed to Github.
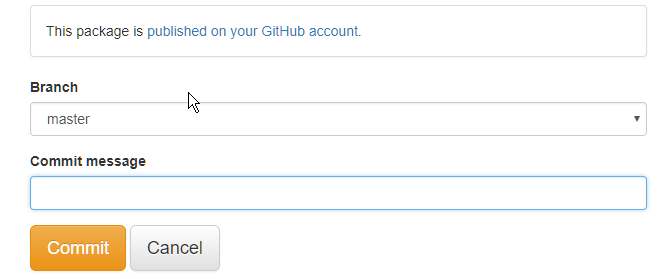
Scroll down to the bottom of the page and click Save, and then the Github button.

Set the Commit message to something descriptive, such as “Added ‘Hello, World’”
Building the demo interview
So far we’ve told you exactly what to include in the interview and template. For this stage of the tutorial, you will need to do some thinking on your own. Building a guided interview has 3 basic steps:
- Deciding what information we need to gather and coming up with descriptive
variablenames for each item of information. - Creating interview screens to gather the information.
- Include the answers you gathered in the interview with formatting in your template.
Fields: Identifying the information we need to gather
Look at the sample template Motion to Dismiss-Original.docx. Think about the information we need to gather in the following categories:
- Parties
- Locations
- Dates
- Conclusions and facts needed to reach those conclusions.
Try it on your own first. Mark any information in the template that will need to change (you can print and highlight on a piece of paper or write it in a separate document such as a spreadsheet). We will need to know:
- The county
- The name of the court
- The Landlord’s name
- The Tenant’s name
- The Tenant’s address and phone number
- Every reason for dismissing the case, numbered 1-3 in the example document.
- The date of service
- The type of service
Write down logical variable names for each piece of information. Docassemble variables should be:
- Short
- Readable (ie., usually you should spell out a word without abbreviations).
- Lowercase
- Include
_to separate words. - Cannot begin with a number but may include a number.
Docassemble fields come in different types, and there are special capabilities that come with each type. Some of the key types you will use in this interview include:
- Dates
- Yesno (True/False, or Boolean values) are easy to use in logical statements.
- Numbers
- Text
- Multiple Choice
fieldsare best used when there is a limited set of valid options.
For each variable in your list, think about what type of field will best represent it.
If you get stuck, look at the interview-basic.yml file for one approach to solving the problem.
Writing interview questions
We will now need to create an interview screen to gather all of the information. We could create a single page that includes all of the variables. This might be very messy and hard to read. A better practice is to group the related questions together. Try it on your own first. Sketch out 5-6 screens to start.
A logical grouping might be:
- The tenant’s name, address, and phone number
- The court name and county
- The landlord’s name
- The bases for dismissal
- The service date and type.
Once you have come up with a list of both variable names and a logical grouping for your questions, start adding the question blocks into your interview-skeleton.yml file. The Docassemble documentation groups questions in various places. For most screens in your interview, you will almost always want to use a fields statement that looks like the one below. Learn more about the fields statement here.
---
question: |
  Fields Demo
subquestion: |
  This is a question that demonstrates using a Fields statement
fields:
  - Did it happen? : my_yesno_variable
    datatype: yesno
  - What date did it happen? : my_date_variable
    datatype: date
  - Tell us where it happened: my_text_variable
A few things to pay attention to:
- notice that the
questionsubquestionandfieldsstatement are all aligned with the leftmost column. The contents of eachstatementare indented with a [TAB] or two spaces. The indents must match each other. - Each
fieldbegins with an indent and a dash-. - The basic format of each question is a description, followed by a colon, followed by the name of the variable where the information will be stored.
- The
dateandyesnovariables are followed by an indented line and adatatypestatement. Thetextvariable does not. Text is the default datatype in Docassemble so does not need to be specified, but special datatypes do.
If you get stuck, look at the interview-basic.yml file for one approach to solving the problem.
It’s a good idea to test the interview as you go along. A quick way to test a question is to temporarily mark it as “mandatory: True”. That will force Docassemble to ask the question.
Putting it all together
Once you have created the interview questions, it’s time to start replacing the text in the template with the variable names. Notice that it is important to update the interview before updating the template. Your interview will generate an error if a variable is used in the template before there is a question that defines it.
In the Word Document template Motion to Dismiss-Original.docx, start by replacing one or two of the items with the variable name. For example, if you chose to name the variable holding the name of the court with the logical court_name, replace the text “Culver Court” with {{ court_name }}.
Before going further, save your template, sync it from Google Drive to your playground, and run the interview to see if it works.
So far we have explained how to use a text variable in a template. What about a True/False or yesno variable? Use if statements. Below is an example of an if statement.
{%p if my_yesno_variable %}
This text only shows if my_yesno_variable is True.
{%p endif %}
This text always displays.
There are a few things to notice. First, we are no longer using the double brackets {{ var }}. Instead, we are using a single bracket followed by a % sign. {% … %}. This syntax is used for control structures in Word templates. Also, notice the p following the %. This tells Docassemble to remove the line that has the if statement on it. Use this whenever the line with the if statement doesn’t contain any other information. A {%p if %} statement must always be matched with a {%p endif %} statement. If you use the p in the opening line, it also needs to be used in the closing line, and vice versa.
You can go very far in creating any template that represents a legal pleading just by using text variables and yesno variables with if statements. As an exercise, finish replacing all of the text you want to be able to change in your template with the variable names you gather in the interview. Use the if control structure for text that only conditionally displays. Remember to use the {%p if … %} style for a numbered list.
If you are stuck, take a look at the Motion to Dismiss-Final.docx file to see one possible solution.
If you are curious, for advanced use other Jinja2 control structures can also be used to control the display of text in the template. For example, when displaying a list of information, you may want to make use of a for statement.
Applying legal reasoning
You may have wondered how the end user of the interview is supposed to know the bases for dismissal. One approach would be to include detailed instructions in the text of the interview. This would involve giving the tenant a mini-primer in eviction law and asking them to apply their new found knowledge to their own situtation. However, a better approach is to use the conditional statement features of Docassemble to do the legal reasoning for the tenant. One of the most powerful features of a guided interview platform like Docassemble is the possibility to simulate a “lawyer in a box” at the other end of the interview.
Here are the basic legal rules necessary to understand each basis for dismissal:
- A landlord cannot terminate a tenancy with a 14 day notice to quit if the tenant paid all rent owed before the landlord sent the notice.
- If the tenant has a lease, the tenant can “cure” the notice to quit by paying all of the rent owed on or before the “answer date”. If the tenant has a tenancy at will (month to month), the tenant can “cure” the notice to quit by paying all rent owed on or before 10 days of receiving the notice to quit.
- If the landlord accepted any rent after sending the notice to quit without including a “reservation of rights” in the notice to quit or immediately when accepting the rent, the termination may be “waived”. A reservation of rights looks like this: “any payments will be accepted for use and occupancy only and will not reinstate the tenancy.”
A highly readable primer on Massachusetts Eviction law can be found here: http://www.masslegalhelp.org/legal-tactics. Check out Chapter 12, the section titled “Stopping an Eviction Before a Trial” to see more detailed information about the basic rules above.
Break the information required into smaller logical elements
Given the rules above, what additional information do we need to know to decide if any of the three bases for dismissal apply? Try it on your own first. When you have finished, you should have a list that looks like the list below:
- What was the answer date?
- Does the tenant have a tenancy by lease or at will?
- When did the tenant receive the notice to quit?
- When did the tenant last pay rent?
- Did the tenant pay the full amount of rent owed?
- Did the notice to quit contain a reservation of rights?
Remove the interview section that asks directly if the bases for dismissal apply. Instead, we will create new interview screens that ask the facts listed above. Try it on your own first.
If you get stuck, look at the file interview-withlogic.yml for one approach to solving the problem.
Apply the logical rules to our interview
Notice that we do not need to make any changes to our template to add this additional logic. A code block in Docassemble can set a variable based on the value of another variable using a logical if statement.
We can include all of our logical rules in a single code block. To get you started, below is an example logical block to test one scenario, a tenant who has a lease curing the notice to quit by paying all rent due sometime before the Answer date. The if statement in the interview is similar to the one we used in the template already.
---
code: |
  if tenancy_type == 'lease':
    if tenant_paid_all_rent_due and tenant_pay_date <= answer_date:
      tenant_cured = True
    else:
      tenant_cured = False
Try completing the exercise for the remaining logical scenarios: a tenant who has a tenancy at will, a tenant who paid before receiving the notice to quit, and a tenant whose landlord waived the notice to quit by accepting rent without a reservation of rights.
You may get stuck with the date math as it is a moderately advanced topic. Docassemble has special functions for working with dates. Here’s an example that sets the my_date variable to a date 10 days after the date we gathered in the interview:
---
code: |
  my_date = gathered_date + date_interval(days=10)
See the documentation for date_interval for more examples.
If you are stuck, take a look at the interview-withlogic.yml file for one possible solution.
Room for improvement
Once you have completed the basic tutorial and tried adding in logic, here are some improvements you should try making:
- Read about Docassemble objects, especially the built-in object types Individual and Address, and the special Legal object types Case and Court. Refactor your variable names to make use of the special features of Objects and the useful dot (.) notation that Objects allow to keep related variables together.
- Read about the Docassemble include_docx_template function. Replace the case caption with a separate Word document that you include into the parent template. Replace the name, address and signature line with a separate Word document as well. In future projects, this will help you keep formatting consistent across your documents.
- Create a Google API key and enable the Address Autocomplete functionality that Docassemble supports on the screen that gathers the tenant’s address.
- Try decorating your questions with a Font Awesome or Material Design icon. For example, find the shortcut code that represents a gavel and add it to the top right corner of the screen that asks for the name of the court the motion will be heard in.
- Add a screening question to your interview that tells the tenant that they do not have a lawyer and requires them to acknowledge that to complete the interview. Look at the Docassemble demonstration interview and read more about events to complete this exercise.
Conclusion
We hope that this tutorial will help you develop your own guided interviews in Docassemble! This tutorial is provided free as a service for anyone who wants to develop on Docassemble. If you notice typos or want to add additional content to this tutorial, pull requests are welcome. Fork this repository and edit README.md in the gh-pages branch, make any changes, and then submit your pull request.